Navigate to the Articles section of your profile which lives under the CONTENT tab in Business Manager.
Viewing all your articles
If you already have any published articles on your profile, these will appear in a list format (pictured below). It shows you the date the article was published, the author and status (live, draft or pending approval).

Each article is given an ‘internal’ article score, based on a number of factors which add up to how comprehensive the article is. Factors include some required fields like article title, article category, banner image, photo credit. Other factors that can help increase your article score are adding the maximum of 5 content search tags, photos and/or a video. It will also increase if you add an SEO article title and SEO article description.
In theory, the higher the article score, the more likely it is to be picked up by third party search engines like Google.
Adding/Editing Article details
To add a new article, click the black button at the top right of your screen called ‘Add a New Article’ which will open a new page ‘Article details’.
To edit an existing article, simply click on the article you would like to edit and it will automatically open the ‘Article details’ for that article.

Here’s where you give your article a Title (mandatory).
You also have the option to enter a short description that gives a reader an overview of what the article is about (Teaser).
The Teaser will appear at the top of your article as an introduction.

The Teaser can also be used to create an SEO description for search engines - more information in the SEO section below.
You will also need to select a category for your article. If you do not select one, it will automatically be assigned miscellaneous.
Finally, select the ‘Author’ of the article. You can select any of your business Team Members (including yourself) to be the author of the article. If the author of the article is not a current team member on your account, please add them so you can select them.
All fields can be edited at any time in the ‘Article details’ page, even after you have published the article.
Once you are happy with your ‘Article details’, please hit continue at the bottom or you can select ‘Page builder’ on the left hand menu.
Using the Article Page builder

Our interactive Article Page Builder has been developed so that you can edit your article and see what it will look like for users in real time, and you are able to customise the layout depending on your preference.
The first step is to upload your banner or hero image for your article. You can drag in a high resolution single landscape image or click on the box to upload it from your computer. The ideal dimensions are 1820 x 818 pixels.
The banner image will also be the thumbnail image of your article, unless you specify that another image should be used as the thumbnail as you build your article and add further images.
If you hover over the image you have uploaded, on the top right corner of the image, you can click the trash can to remove the image so you can replace it with a different one. If you click the ‘edit’ or pencil button, you will find the image editing tools.

The ‘compass’ icon lets you adjust how the image fits in the provided space, the ‘magic wand’ icon allows you to apply a filter from a variety of available filters. Make sure to hit ‘Apply’ if you want to save any changes you make or ‘Cancel’ if you don’t want to save any changes.
Click ‘Add section’ below your banner image to start creating the content for your article.

There are 4 different section types you can choose from:
- Photos
- Gallery
- Videos
- Text
- Products
Within each of these section types, you can select some different styling options:


Simply select the section and style you wish to insert and then click to edit that section eg. insert text, add image from your library. You can also auto-upload up to 20 images at one time, these will be laid out in the order that they're selected.
Click here to learn more about the ideal size for images within the page builder.

Articles work in a box-like system whereby you can create various sections, edit them, rearrange them or delete them as you go.
Whenever you add an image, hover over the image and in the top right hand corner a menu 3 icons will appear.

The ‘tag’ allows you to tag specific products shown in the image, just like you can on Projects. This is then shown to users who can click to view the product listing on ArchiPro.
Clicking on the pencil icon allows you to:
- Add a caption
- Credit your photographer for the image (if your photo was not taken by a professional photographer but by one of your staff, please enter your business name here)
- Reposition the image
- Add a filter
- Select the image to be used as the thumbnail image for the article (this is the image that will appear in search results and on your profile)

Finally, the trash can allows you to remove the image altogether and replace it with another image.
You will also see that each section you add has a 5 icon menu. The 'gear' icon will allow you to switch to a different section type. The 'windows' icon will allow you to re-arrange all of the sections. The arrows will allow you to move the section up or down one space. Finally the trash can will delete the whole section entirely.

As you build your article, you can preview what it will look like for users (once published) at any time by clicking the ‘eye’ icon at the top right of your screen.

Once you have built your article, using whichever sections you like, hit the Continue button at the top right to optimise your article for search on ArchiPro.
Articles are limited to 70 sections in total.
Optimising your article for Search on ArchiPro
These search tags help your content be discovered by ArchiPro users. For example, if your article is about a specific product like a bedside table, that would be a good search tag to add. You can add up to five search tags - the more you add, the easier it will be for users to discover your content. You must add a minimum of one.
Once finished, hit the ‘Continue’ button or navigate to the final step using the left hand menu, ‘SEO’.
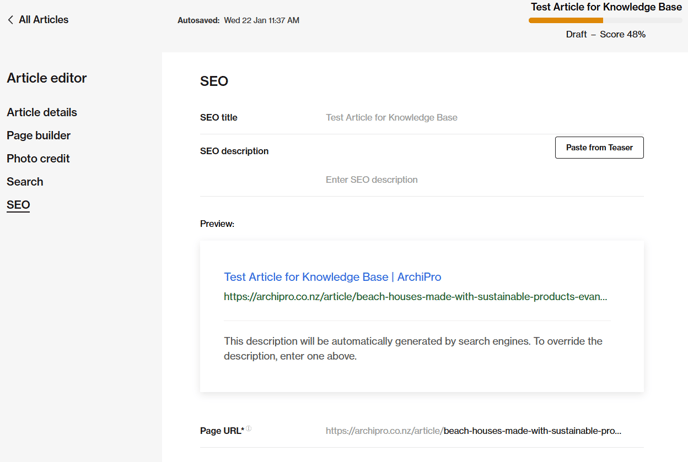
Optimising your article for SEO
This page shows you exactly what your article will look like in Google Search results. If you are happy with the article title, simply leave it blank and it will pull through as it is. If you would like to shorten the article for search or make any changes, you can edit in the ‘SEO title’ field.
For the SEO description, we suggest you click the ‘Paste from Teaser’ button to give Google some extra information on your article that will help the search engine determine its relevance. It is not mandatory and if left blank, the search engine will automatically generate an SEO description. You can also enter your own specific SEO description.
Publishing your article
To publish your article, click the Publish button on the top right of the page. Your project will appear on your profile immediately. Your Article will need a score of at least 50% in order to be able to publish.

You can track the status in your Article section where you can view all uploaded articles.
If you need additional help, take a look at our article, Support for ArchiPro Clients: Your Guide to Getting Help, to explore the best next steps.
Last Updated: 22/01/2025